Technologies we'll use :
1. OpenCV - In my opinion, it is one of the finest Computer Vision technology suite available today. Two key reasons supporting this:
- It has rich cross platform support for desktop OS, including Windows, Linux, MacOS, FreeBSD etc and also mobile OS including Android, iOS, Maemo and Blackberry10.
- It supports GPU acceleration for real time operations.
2. Language - Python.
3. Development Environment(IDE) - Please use the one you are most comfortable with. I personally prefer Pycharm for my python coding. But again, please use the one you are most comfortable with.
Lets build our system:
For a moment, let us think like the end customer of our product. What would he/she expect this security system to do?
On asking this key question, we get 3 goals:
1. Capture the video of the required area.
2. Detect motion which is suspicious.
3. Produce alarm sound(on detecting suspicious motion).
We'll achieve all of these step by step.
NOTE - To build this system, we need to write code. And I will be explaining each step of the coding required to build this, along with the theoretical explanation.
Hence this article would be technical from this point onwards. And programming experience is beneficial to follow along.
If coding doesn't fascinate you, still there is lot of interesting content for you, around how motion is detected and different image processing techniques required to build this.
Preliminary setup:
First create a python project in your favorite IDE, providing it a name you like, say ComputerVision.
To get OpenCV library, use pip package manager and execute the following command in your IDE.
In Pycharm you can open the terminal and simply execute the following pip install command:
pip install opencv-python
Then create your python code file(.py extension) inside the project. Provide it a name you like.
Import the OpenCV package using:
import cv2
Step 1 - Capture video:
To capture the video, following is the code which I'll explain step by step:
import cv2
video_camera=cv2.VideoCapture("backyard_intruder.mp4")

while video_camera.isOpened():
    ret_value,frame=video_camera.read()

    if cv2.waitKey(5)== ord('x'):
        break
cv2.imshow("Akshay's cam", cv2.resize(frame,None,None,fx=0.40,fy=0.45))
OpenCV's VideoCapture class facilitates capturing video from your camera or any existing video file.
Create a vedio_camera object using the constructor of VideoCapture class, which takes one argument. This argument can be either the index of the actual camera(which we need to capture the video from) or the name of a video file.
To use just the webcam of your laptop, pass 0 as the argument as follows:
video_camera = cv2.VideoCapture(0)
For this exercise, I have used an intrusion video(backyard_intruder.mp4) which I downloaded from Youtube, as was captured by a surveillance camera. I'll build this security system on top of this video.
To ensure the video is being captured, we would use the isOpened() method of VideoCapture class in a while loop, which returns True if the video capturing has been initialized already, else False and the while loop breaks.
To capture and show the video or camera's output on screen we need two things:
1. Read the captured video:
This is achieved using read() method of VideoCapture class. This method grabs and returns the next frame captured.
ret_value,frame2 = video_camera.read()
2. Show it on the screen:
Use OpenCV's imshow() method. This shows the image in a window. Takes 2 arguments
1) Window name
2) Image to show
cv2.imshow("Akshay's cam", frame)I have named the window as "Akshay's cam".You can give it any preferred name.
I am also adding a functionality to allow us to stop the video, by pressing a key('x' key) on the keyboard, using OpenCV's waitKey() method:
if cv2.waitKey(5) == ord('x'):
    break
This waits for 5 milliseconds and look for any pressing event of x key. As soon as you press x key it will close the window.
Now we have the code which shows the selected video, or anything captured by web cam of the laptop in a window named "Akshay's cam".
This opens up the following video(I am showing a still frame from the video):
Since this video wasn't appropriately fitting in the window, hence I have resized it using cv2.resize to get the whole video visible on my screen. Using fx and fy as the x axis and y axis resize percentages.
Step 2 - Detect motion:
How is motion detected? 🤔
Just look at this video stream of a heart, flying out of a magician hat into the clouds.
But wait !! Is it a video? Isn't it just a booklet of still pages, when flipped in an order, producing this illusion of a video?
Yes both the statements are correct.
It is a video & it is a sequence of still images.
Because a video is actually a sequence of still images(frames), when displayed at a frame rate called FPS(Frames per second). I guess you might have heard this term FPS at some point.
Read this very carefully 👇
If the person holding this book, decide not to flip even a single page and just shows us the first page(as shown in below image), we would not see any motion. We would be able to see motion, only when he shows the second page(frame) which is slightly different from the first page(frame).
Makes sense?
If not, please read the above statement once again, because this is the fundamental concept behind motion detection.
We'll use this concept to detect the intruder's motion. We'll grab all the still frames from our video and calculate the difference of each frame with the previous frame. And any difference in frames would be a sign of motion. We'll get this difference using absdiff() method of OpenCV.
I am creating 2 frames frame1 and frame2 in sequence, inside the while loop and getting a difference difference_frames using absdiff() method of OpenCV.
absdiff()requires 2 frames to compare as arguments.
while video_camera.isOpened():
    ret_value, frame1 = video_camera.read()
    ret_value, frame2 = video_camera.read()
    difference_frames=cv2.absdiff(frame1,frame2)
    if cv2.waitKey(5) == ord('x'):
        break
cv2.imshow("Akshay's cam", cv2.resize(difference_frames, None, None, fx=0.40, fy=0.45))
Above code detects motion and following video is the result of this code:
Now that we have the motion detected, we need to apply different image processing techniques such as changing color scale, smoothening using blurring, thresholding, dilation etc. Don't worry we'll look at each of these, with a proper video showing the result of applying each technique. Deeper details of these techniques, are out of the scope of this article and we'll focus on these, to the extent required for building this system.
i) Gray scale - For detecting the motion and form accurate contours(which we'll perform just in next steps), a gray scale image is always recommended over a colored image. Precisely for our use case, colors are more of a noise.
Hence we'll convert the color from RGB to Gray scale using cvtColor method as follows, passing the source as difference_frames and color code as COLOR_RGB2GRAY :
gray_difference_frames=cv2.cvtColor(difference_frames,cv2.COLOR_RGB2GRAY)
Now when we show the grayscale differences in the window as follows, we'll see it gray scaled instead of RGB colored.
cv2.imshow("Akshay's cam", cv2.resize(gray_difference_frames, None, None, fx=0.40, fy=0.45))
ii) Blurring - To further reduce noise and smoothen the transition, we should smoothen the frames using a blurring technique. Though we have several options of blurring as part of OpenCV, such as blur(),GaussianBlur(), medianBlur() etc. But the one I'll use is GaussianBlur(). It takes 3 arguments -> source - which will be the gray scaled frames difference, Gaussian kernel size and Kernel's standard deviation in X direction(which we are setting to 0):
blur_frames=cv2.GaussianBlur(gray_difference_frames,(5,5),0)
Lets show this blurred result, and you will see the edges of this person are more blurred:
cv2.imshow("Akshay's cam", cv2.resize(blur_frames, None, None, fx=0.40, fy=0.45))
iii) Thresholding - Thresholding is an important image segmentation technique to convert grayscale image into binary image and separates the foreground pixels from the background pixels.
Using thresholding, we'll separate our focus entity's(intruder) foreground pixels from the background pixels. We'll use threshold method which takes in the src, thresh which I'll keep at 20(sufficient for this use case), maxval maximum value to be used, and type of thresholding which I am using THRESH_BINARY as follows. There are though other thresholding types such as THRESH_MASK,THRESH_OTSU,THRESH_TOZERO,THRESH_TRIANGLE etc which you can use on as needed basis:
_, threshold = cv2.threshold(blur_frames, 20, 255, cv2.THRESH_BINARY)
On passing this threshold to imshow() we get the following result:
cv2.imshow("Akshay's cam", cv2.resize(threshold, None, None, fx=0.40, fy=0.45))iv) Dilation - Dilation is a technique, which adds pixels to the boundary of the objects, such that the holes in the objects are filled and they become more visible. The opposite of dilation is erosion.
We'll use OpenCV's dilate() method. The key arguments for this are the source and iteration(number of times dilation is applied), for which 3 is a sufficient value for our use case.
dilated_otpt = cv2.dilate(threshold, None, iterations=3)
On showing the dilated version using imshow(), we see more visible boundaries of the moving intruder. Just compare the following dilation video with the previous threshold video and you can feel the difference in the boundaries.
cv2.imshow("Akshay's cam", cv2.resize(dilated_otpt, None, None, fx=0.40, fy=0.45))
v) Contours - Now is the time to create contours around our focus point which is the intruder.
Well what is a contour?
Definition - Image contouring is a process of identifying structural outlines of objects in an image.
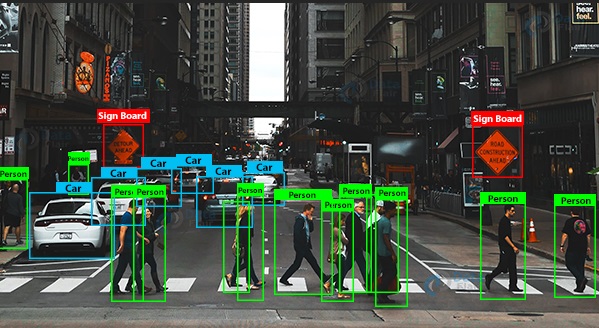
In simple terms, these green rectangles shown in the image below are the contours.
a) findContours() - I am using findContours() method of OpenCV and passing the dilated_otpt as image, mode which is a retrieval mode. Though there are different modes, I am choosing RETR_TREE which retrieves all of the contours and reconstructs a full hierarchy of even all nested contours. findContours() also requires ContourApproximationMode, which I am using CHAIN_APPROX_SIMPLE,to retain only the required points and remove all the redundant points, which is not achievable using CHAIN_APPROX_NONE. contours_fetched, _ = cv2.findContours(dilated_otpt, cv2.RETR_TREE, cv2.CHAIN_APPROX_SIMPLE)
b) drawContours() - Use drawContours() for drawing the contour around intruder. This needs:
> image, which I am passing my frame1,
> contours, which is the output of findContours() ie' contours_fetched,
> contourIdx, keeping this as -1, because if this is negative then all the contours are drawn,
> color, which I am keeping as green (0, 255, 0). Remember these are RGB color, where I am keeping 0 for both Red and Blue and 255 for green.
> thickness, I am setting this to 10, to make contours look a bit thick.
cv2.drawContours(frame1, contours_fetched, -1, (0, 255, 0), thickness=10)
Following video shows the resultant green contours:
But wait !!
If you replay above video and notice carefully, even the flies in the backyard, as well as the moving tree leaves due to wind, are also getting contours created around them. But we don't want to be alarmed, in the middle of the night, if an insect flies in the backyard or a leaf moves due to blowing wind. For this I'll retain only the required contours.
Retaining only the desired contours:
To achieve this, we'll filter all the contours which are lesser than a particular area.
A contour's area can be retrieved using contourArea()method, to which I'll pass each contour by iterating over contours_fetched, which was the result of findContours() as shown previously. Only if the area of the contour is greater than 73000, then we would get the bounding rectangle coordinates and form the rectangle contour around it, else we'll continue the while loop.
boundingRect(contour)returns the x coordinate, y coordinate, width and height of the bounding rectangle.
Calling the rectangle(frame1,(x,y),(x+w,y+h),(0,255,0),thickness=10)by passing it frame1, start and end coordinate points of rectangle which are (x,y) and (x+w,y+h), we get the rectangle formed. For green color using (0,255,0)and a thickness of 10 of the green rectangle contour.
Following code achieves this logic of filtering small contours and forming rectangle contours only around the intruder.
for contour in contours_fetched:
    if cv2.contourArea(contour)<73000:
        continue
    x, y, w, h = cv2.boundingRect(contour)
    cv2.rectangle(frame1,(x,y),(x+w,y+h),(0,255,0),thickness=10)
Finally we have now reached the point where we are now able to detect the motion of the intruder in the backyard and draw contours around his motion, as show in this video:
Required contours around intruder's motion
Step 3 - Alarm on detecting the motion:
Now the final step. When the motion of intruder is detected, we want an alarming sound to be played, so that we can take necessary action. This I'll achieve using winsound. Just import winsound using:
This module has PlaySound utility function, to which we can pass a sound .wav file. I am passing a TF016.wav sound file. Also since this sound should play asynchronously as soon as the motion is detected, we'll use winsound.SND_ASYNC to ensure asynchronous alarm sound.
This TF016.wav I have kept in the same root folder as my code.
To play sound, there are also other different modules such as playsound, which you can simply install using pip install playsound. It is a light weight single function module, which has a function called playsound and supports different sound file formats.
Now that the alarm sound has been integrated, let us look at the final output of our surveillance alert system:
Output with alarm sound on intruder's motion
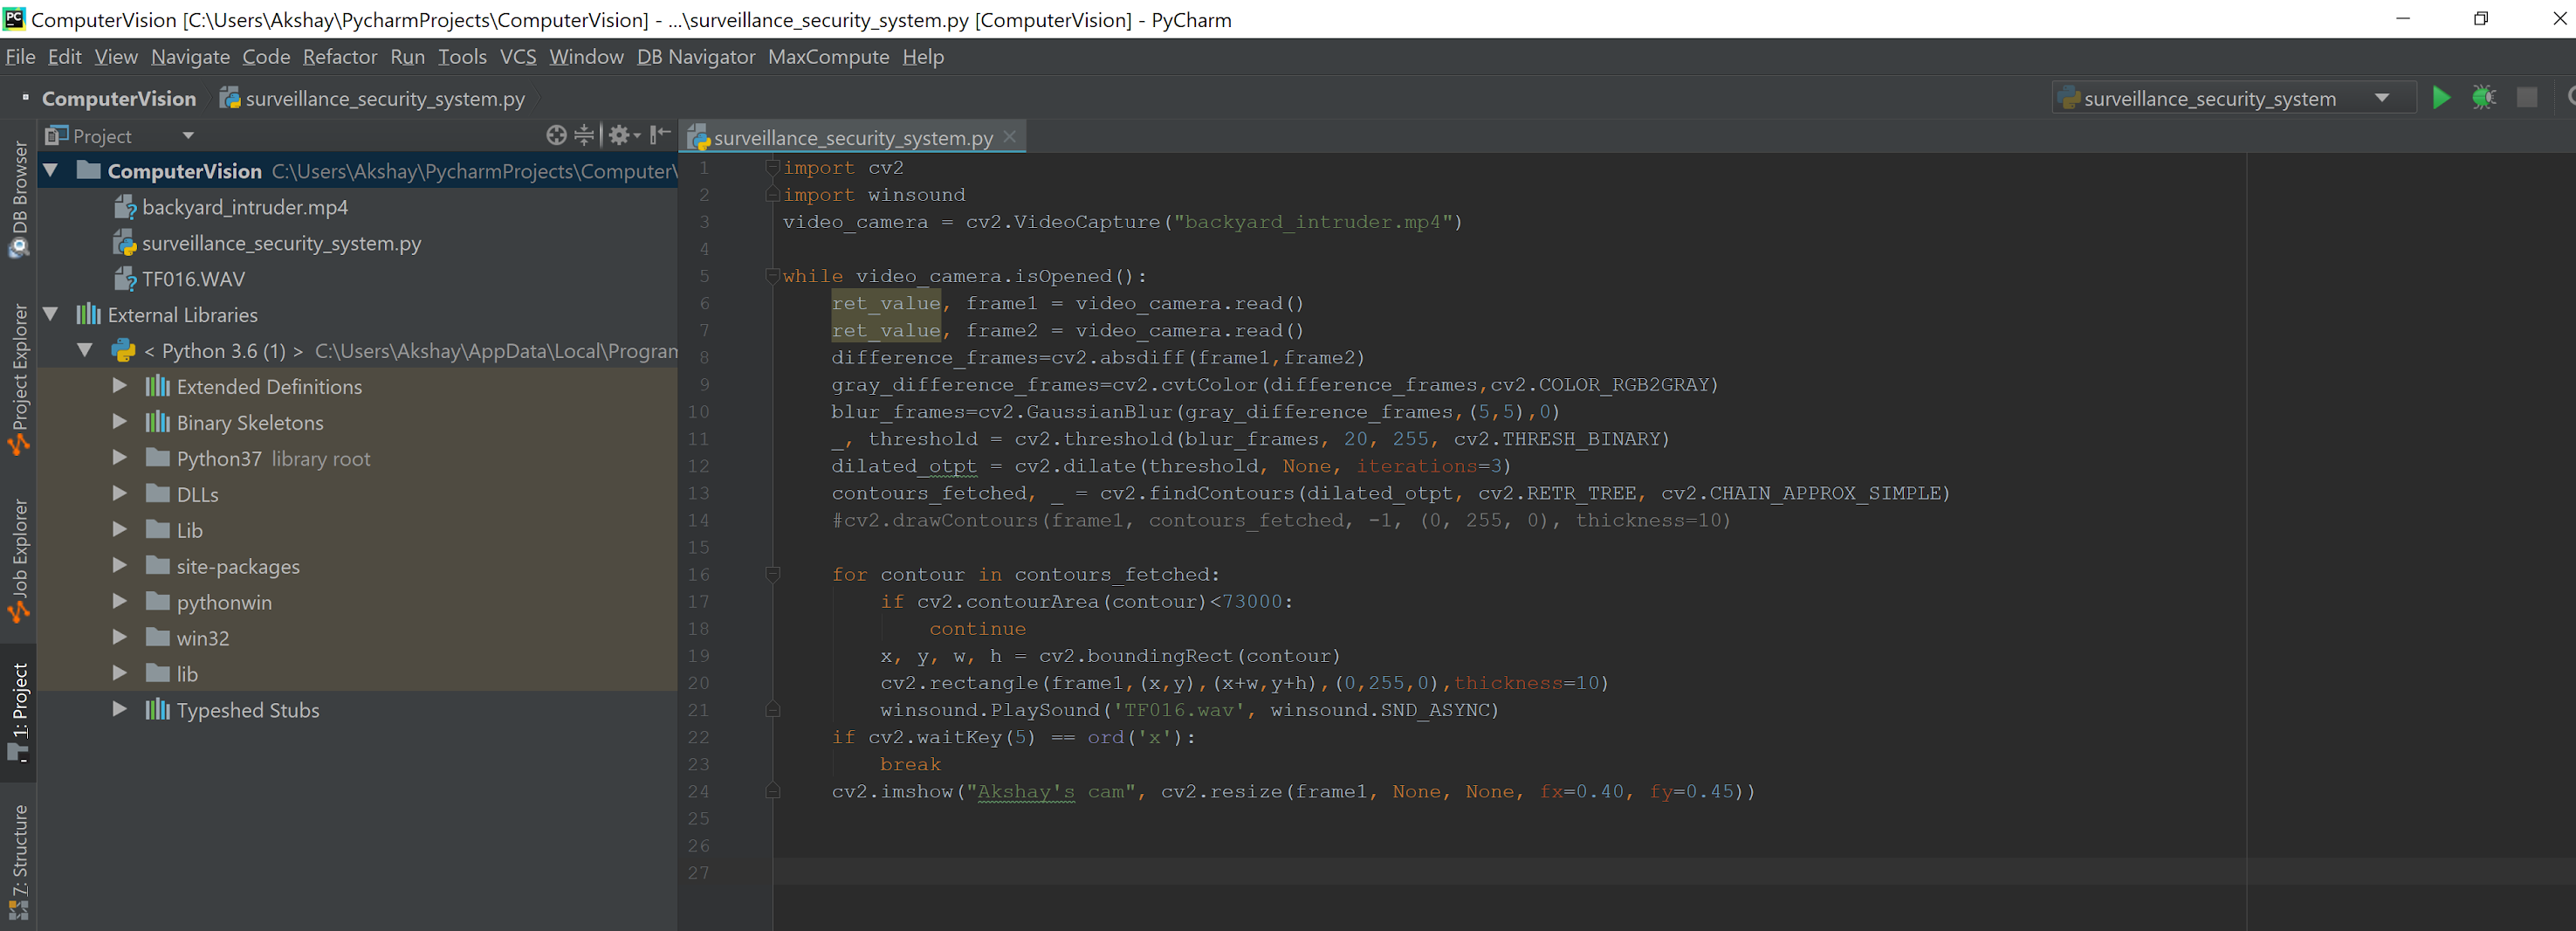
My full source code(from my Pycharm IDE):
I hope this was helpful, to understand how we can use Computer Vision to build intelligent systems, with intelligence a bit similar to what human eyes and brain together can achieve.


Comments